Getting Started
How to Measure and Mark Wood Accurately
Learn how to measure wood accurately with a tape measure, combination square, and marking knife, and avoid the cumulative errors that ruin cuts.
Accurate measurement is the single skill that separates clean joinery from parts that almost fit. Get the layout right and everything downstream, including sawing, planing, and assembling, goes smoother.
The Layout Tools Worth Having
You don't need a full drawer of layout tools to do good work, but each tool in this short list does a specific job that nothing else does as well.
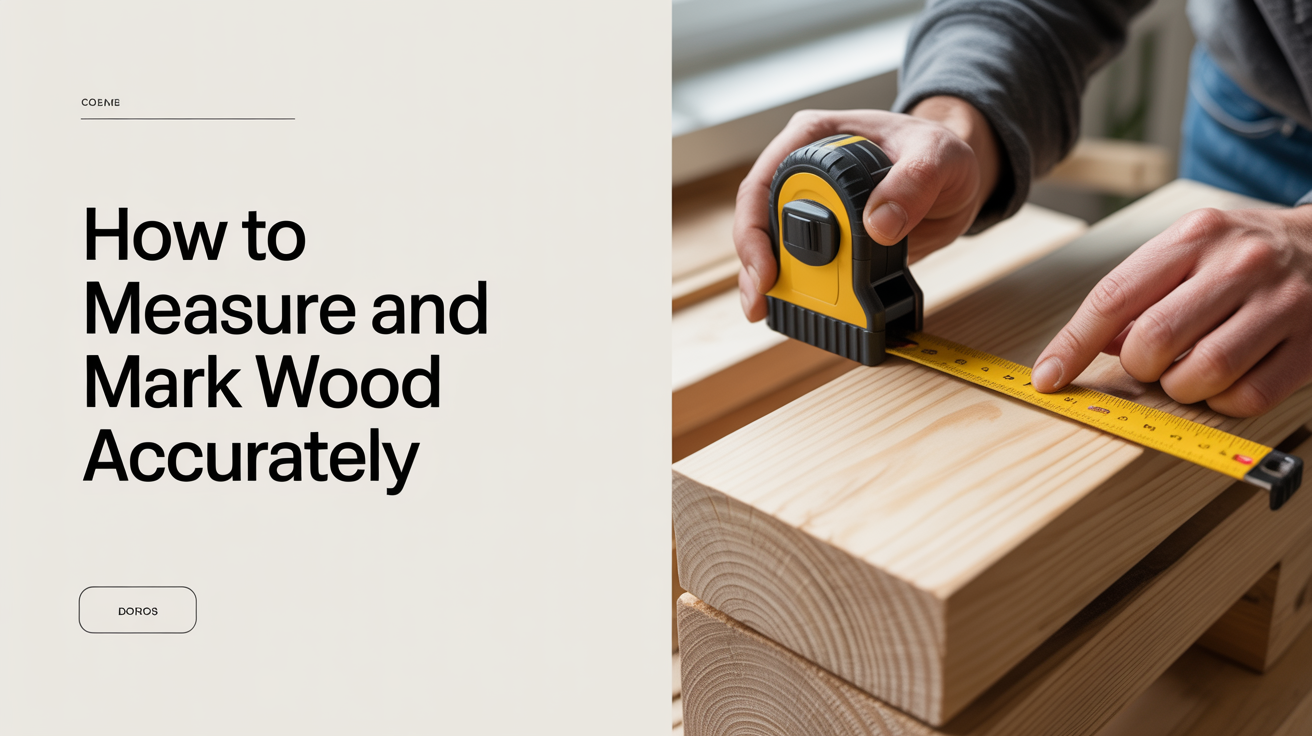
Tape Measure
A 16-foot or 25-foot tape covers most furniture and cabinet work. Look for a wide blade (1 inch or more) that stays stiff when extended. A floppy blade makes it hard to read at arm's length. The hook at the end is designed to slide slightly: it moves the exact thickness of the hook itself, so the tape reads correctly whether you're hooking on an outside edge or butting the hook against an inside surface.
One habit worth building now: avoid the first inch of the tape when you can. That area accumulates hook wear fastest. "Burn" an inch by aligning the 1-inch mark with the end of the board and subtracting 1 from your reading.
Combination Square
A combination square is the layout tool beginners underestimate most. It's a ruler with a sliding, lockable head that references both 90 degrees and 45 degrees. You can check whether a face is square to an edge, scribe a consistent line parallel to an edge, and verify flatness across a board face.
Buy one with a metal body and a blade that doesn't wobble when locked. A loose head makes every line it draws inaccurate by the same amount, and that error is hard to spot in the moment.
Marking Knife vs. Pencil
A standard pencil line is roughly 0.5 to 1mm wide. When you cut on a pencil line, you have to decide: cut on the left edge, the right edge, or the center? That ambiguity is small on a single cut but it compounds across multiple parts.
A marking knife scores a thin, crisp groove into the wood fiber. A saw or chisel placed in that groove registers there and nowhere else. For joinery and any fit-critical cut, a marking knife gives you a reference you can feel under the tool.
For rough layout (marking which board is which, circling the waste side of a cut, numbering parts) a pencil works fine. Use a knife where precision matters, a pencil where it doesn't.
Marking Gauge
A marking gauge scribes a line parallel to a reference face at a fixed distance. It's the right tool for laying out tenons, mortises, and rebates. The wheel-style gauge (sometimes called a cutting gauge) leaves a cleaner line than the older pin style and costs only a few dollars more. Worth the upgrade.
Reading Your Tape Measure Without Guessing
Most beginner measurement errors come from misreading fractional markings under pressure. Here's how imperial tapes are laid out:
- The longest mark between inch marks = 1/2 inch
- The next longest marks = 1/4 inch and 3/4 inch
- The marks of equal, shorter height on either side of those = 1/8 inch
- The shortest marks = 1/16 inch
Reading "3 and 5/16 inches" means: find the 3-inch mark, pass the 1/4-inch mark, then count two more small marks past it.
A practical habit: say the measurement out loud before you lift the tape. Then write it directly on the part with a pencil, or score a mark immediately. Working memory is not a reliable layout tool.
Marking Techniques That Produce Clean Lines
Use a Knife Wall for Saw Registration
When cutting a tenon shoulder or chiseling a mortise, score a line with a marking knife held against your combination square. Then pare a small V-groove into the waste side of that line with a chisel. This groove is called a knife wall. It gives your saw a physical register to start in and prevents the blade from skating across the face before it bites.
Mark the Waste Side
Every time you mark a cut line, put a small X on the piece you're cutting off. This one habit prevents the most common beginner mistake: cutting on the wrong side of the line and ending up with a part 1mm short. On tight joinery, 1mm is the difference between a snug fit and a loose one.
Carry Lines Around the Board
For cuts that go around all four faces of a board (a tenon shoulder, for example), use your combination square to extend the line across each face in turn. When you reach the fourth face, the line should meet cleanly with where you started on the first face. If it doesn't, your reference face or the square's head is off.
Story Sticks: Measuring Without Numbers
Measuring the same dimension repeatedly introduces error every time. Each reading has a small uncertainty, and those uncertainties stack. "Measure twice, cut once" reduces errors, but a story stick eliminates the problem at the source.
A story stick is a thin piece of scrap wood or hardboard on which you record the actual physical dimensions of a project: not numbers, but real marks made directly from the space or the parts. For a set of shelves, you hold the stick against the cabinet side and mark exactly where each shelf falls. You then transfer those marks to each component by holding the stick against it.
No arithmetic. No converting "23 and 11/16" from tape to pencil to wood. Every part is marked from the same physical reference, so any small inaccuracy is consistent across all parts, and consistent errors often cancel when parts come together.
Story sticks work especially well for:
- Repeated parts (multiple shelf boards, drawer fronts, cabinet doors in a run)
- Fitting work to an existing space (built-ins, stair treads, window frames)
- Any situation where parts need to match each other rather than match a number on paper
If you're just starting out, the beginner woodworking tool kit article covers how to pick a combination square and marking gauge worth trusting for this kind of layout work.
Practical Measurement Habits at a Glance
| Habit | Why It Matters |
|---|---|
| Burn an inch on the tape | Avoids worn-hook errors at the blade's start |
| Mark the waste side with an X | Prevents sawing the wrong side of a line |
| Use a marking knife for joinery | Creates a physical groove to register tools in |
| Use a story stick for repeated parts | Cuts cumulative transfer error to zero |
| Say measurements aloud before moving | Keeps memory from corrupting the reading |
| Verify your square before trusting it | A dropped square can go out; test it before layout |
For more on setting up a space where you can measure and mark comfortably, see the small garage workshop setup guide. And if you are still figuring out where layout fits in the overall learning sequence, woodworking for beginners lays out the full order of skills.
Frequently Asked Questions
Do I need a marking knife, or can I use a sharp pencil?
For rough layout (labeling boards, marking which face is the reference face, indicating cut order) a pencil is fine. For joinery work where fit matters, a marking knife makes a real difference. The groove it leaves gives your saw and chisels a physical stop to register against. A pencil line, no matter how sharp, is still a fuzzy guideline.
What does "measure twice, cut once" mean in practice?
It means: take your measurement, mark the board, then verify that mark before picking up a saw. The second check doesn't have to be a second tape reading. It might be holding the two parts side by side to confirm they look right, or checking that your combination square is fully seated before scoring a line. The point is to catch the error before wood is cut.
Why do my repeated parts keep coming out slightly different lengths?
This is almost always cumulative measurement error. Each time you measure and mark independently, small reading differences stack up. The fix is to use a story stick: mark the first part directly from your reference, then use that part as the template for all subsequent pieces. Or set up a stop block on your saw so every cut lands at exactly the same length without re-measuring each time.
How do I check if my combination square is actually square?
Draw a line along the blade against a flat edge. Flip the square over (same edge, head on the same side) and draw a second line from the same starting point. If the two lines are parallel, the square is accurate to 90 degrees. If they form a slight V, the head is off by half the visible angle. Most inexpensive squares are close enough; a dropped square is a different story.
Should I measure in fractions or decimals?
For woodworking with imperial tape measures, fractions are standard: 1/2, 1/4, 1/8, 1/16 inch. Decimals appear more in machining and engineering contexts. Stick with fractions for shop work; every tape measure and most marking tools are laid out in fractional increments, so it's less to translate.