Projects & Plans
Build a Beginner's Step Stool
Build a solid one-step stool from a single 1x10 pine board using pocket-hole joinery and wood glue. Full cut list, layout tips, and finish guidance.
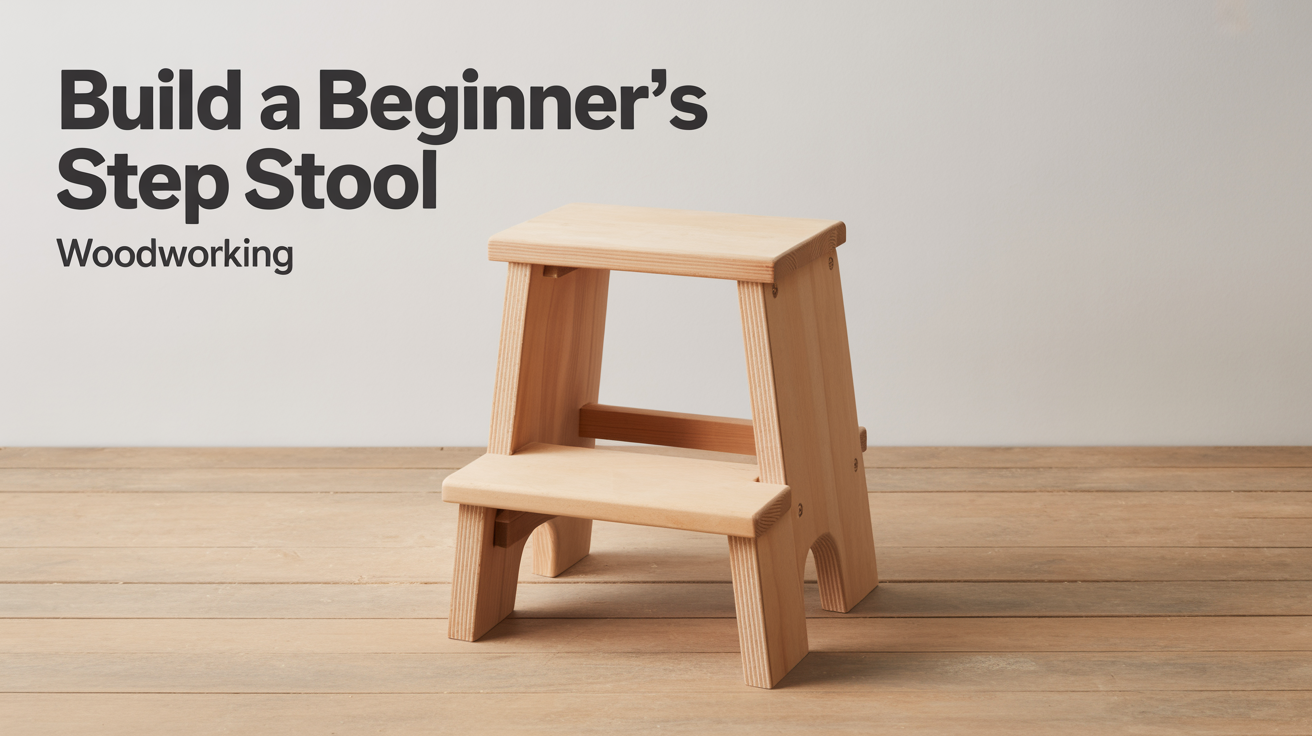
A one-step pine stool is one of those builds that earns its keep long before the finish is dry. This guide walks you through the whole project from a single 1x10 pine board, using pocket-hole joinery and wood glue.
Why a Step Stool Is the Right Second Project
If you have already built a simple wooden box, you know how to measure, crosscut, and drive pocket screws. A step stool uses every one of those skills and adds one new challenge: the angled side notch that gives the stool its feet. That single new cut is teachable, and the payoff is a piece you will actually reach for in the kitchen or garage every week.
The finished stool sits about 9 inches tall and holds the weight of a grown adult without any flex. It is small enough to complete in a few hours and forgiving enough that small measurement variations rarely cause problems.
Materials and Tools
Lumber
One 8-foot length of 1x10 common pine is enough for all three parts, with a few inches to spare. Actual dimensions for a 1x10 are 3/4 inch thick by 9-1/4 inches wide. Common pine is inexpensive, widely available at home centers, and cuts cleanly with a circular saw or miter saw.
Hardware and supplies
- 1-1/4 inch pocket screws (coarse thread for softwood)
- Wood glue
- 120-grit and 180-grit sandpaper
- Wipe-on polyurethane or a water-based finish
- Tape measure, pencil, combination square
Tools
- Miter saw or circular saw with a straightedge guide
- Drill and pocket-hole jig (a basic model works fine)
- Jigsaw or handsaw for the notch cuts
- Random orbital sander or sanding block
- Two bar clamps or pipe clamps
The Cut List
All three parts come from one 8-foot 1x10 board. Mark all three cuts in pencil before you touch the saw to confirm you have enough material and to minimize waste.
| Part | Qty | Length | Width | Notes |
|---|---|---|---|---|
| Tread (top) | 1 | 14 in | 9-1/4 in | Full board width |
| Side panel | 2 | 12 in | 9-1/4 in | Full board width, notched at bottom |
The two side panels each get a foot notch cut from their bottom corners. That notch raises the stool slightly off the floor and creates two feet that resist rocking on uneven surfaces.
Layout tip: mark all three pieces before cutting. Start from one end with the tread (14 inches), then two sides (12 inches each). You will use about 38 inches of an 8-foot board, leaving a comfortable margin for error.
Cutting the Side Notches
The notch on each side panel is what separates this project from a simple box. It looks harder than it is.
Notch dimensions: cut a 1-1/2 inch tall by 3 inch wide rectangle from each bottom corner of both side panels. This creates feet that are about 3 inches long, which keeps the stool stable without making it look awkward.
Laying it out cleanly:
- Mark 3 inches in from each bottom corner along the bottom edge.
- Mark 1-1/2 inches up from the bottom edge at those same points.
- Connect the marks with a combination square to form a clean rectangle.
- Repeat the same layout on the second side panel.
Cutting with a jigsaw: clamp the panel to your bench. Cut along the inside edge of the pencil line, leaving the line visible. Make the vertical cut first, stop at the corner, back out slightly, then make the horizontal cut. The waste piece drops away.
Cutting with a handsaw: cut the vertical line first with a backsaw or crosscut saw, then rotate the panel and cut the horizontal line. Work carefully as you near the corner so you do not overshoot.
After cutting, stack the two sides face-to-face and hold them up to the light. Any visible gap means one notch needs a small trim with a chisel or rasp before assembly.
Assembly: Pocket Holes, Glue, and the Tread Joint
Pocket-hole joinery is the right method for this build for two reasons: the joints are fast to drill and the screws draw the tread tight against the sides while the glue cures. You do not need clamps on the tread-to-side joint if your pocket screws seat properly, though a clamp on each side during the glue-up is good practice.
Drilling the pocket holes
Set your pocket-hole jig for 3/4 inch material. Drill two pocket holes on each end of the tread piece, positioned about 1 inch in from each long edge. That gives you four screws per joint, which is plenty for a stool this size.
Dry-fit before glue
Before you apply anything sticky, clamp the assembly together and check that the tread sits flush on top of both sides. The tread should overhang each side equally on both ends. Adjust your parts if needed. Skipping the dry-fit is how you discover misaligned parts after the glue has grabbed.
Assembly sequence
- Apply a thin, even bead of wood glue to the top edge of one side panel.
- Set the tread in position, align it front-to-back and side-to-side, and drive the pocket screws. Moderate torque only; over-driving in softwood strips the pocket-hole wall.
- Repeat on the second side.
- Wipe any glue squeeze-out immediately with a damp cloth. Dried glue under finish creates a visible blotch in pine.
Why this joint needs both glue and screws
A step stool takes concentrated load every time someone steps on it. Glue alone eventually fails in softwood under repeated shear. Pocket screws alone can work loose with daily use. Together, they lock the joint mechanically and chemically, and hold reliably over years.
Check for square: before the glue sets, measure diagonally corner to corner in both directions. Both measurements should match. If they do not, clamp across the longer diagonal until they do, then let the glue cure fully.
Sanding and Applying a Finish
Sanding through the grits properly is what separates a stool that looks built from one that looks bought. On pine, this step matters more than on most hardwoods because pine shows every scratch and machine mark under a clear finish.
Sanding sequence
- Start with 120-grit to remove mill marks, pencil lines, and any rough spots from the saw cuts. Work with the grain. Spend extra time on the top face of the tread.
- Round over every edge and corner by sanding at roughly 45 degrees with 120-grit for a few passes. You do not need a router to soften edges. This also removes sharp corners that would catch clothing or scratch bare feet.
- Move to 180-grit and sand all faces again. This closes the grain and gives the finish something smooth to bond to.
- Remove all dust with a tack cloth, then wipe the whole piece with a lightly dampened rag. Let it dry 20 minutes. This raises the grain slightly. One final pass with 180-grit after it dries and the surface will stay smooth under finish.
Finish
Wipe-on polyurethane is the most practical choice for a step stool. It is forgiving to apply and holds up well to the scuffs and light impact a step stool receives. Apply three thin coats with a lint-free cloth, sanding lightly with 220-grit between the first and second coats to knock off any dust nibs. The third coat usually does not need sanding unless you feel a rough patch.
A water-based matte finish works too and dries faster. Danish oil gives a nice natural look but provides less protection and will need occasional re-oiling. For a stool that gets daily use, polyurethane is the better long-term choice.
Let the final coat cure at least 24 hours before use. Polyurethane takes longer to fully harden than it looks dry, and loading it early can leave impressions in the surface.
Frequently Asked Questions
Can I use a 1x8 instead of a 1x10?
Yes, but the stool will be narrower front-to-back. A 1x8 has an actual width of 7-1/4 inches, which makes the tread shallower and slightly less stable under load. If that is what is available, increase the tread length by 2 inches to partially offset the reduced depth.
How much weight will a pocket-screw step stool hold?
A step stool built with two pocket screws per joint plus wood glue will hold a normal adult standing on it without any trouble. Pocket screws in softwood are not the strongest joint in the joiner's vocabulary, but for a small stool with this much glue surface in contact, they are more than adequate for everyday use.
My notch cuts have a rough inside corner. Does that matter?
Not structurally. The notch faces are on the bottom of the stool and mostly hidden. If the roughness bothers you, clean up the inside corner with a sharp chisel and sand the faces smooth. Small variations in notch shape do not affect how the stool stands.
Do I need to pre-drill before driving the pocket screws?
The pocket-hole jig handles the angled pilot hole automatically. You do not need a separate pilot hole through the mating piece. Keep your drill speed moderate rather than maximum when driving into pine so you do not strip the pocket.
My stool rocks slightly on a flat surface. What do I do?
Check whether all four foot faces are sitting flat. If one notch was cut slightly deeper than the others, that foot is shorter and the stool will rock. Sand or rasp a small amount from the other three feet until the stool sits steady. Alternatively, stick small self-adhesive rubber pads to each foot, which also protects the floor.