Projects & Plans
Build a Simple Wooden Box: A First Project
Learn how to build a wooden box from scratch with this beginner-friendly guide covering tools, a cut list, step-by-step assembly, and finishing tips.
A wooden box is one of the most honest projects you can build. It covers every fundamental skill: measuring, sawing, joining, gluing, squaring, and finishing. Get this right and you'll have the confidence to tackle almost anything else in the shop.
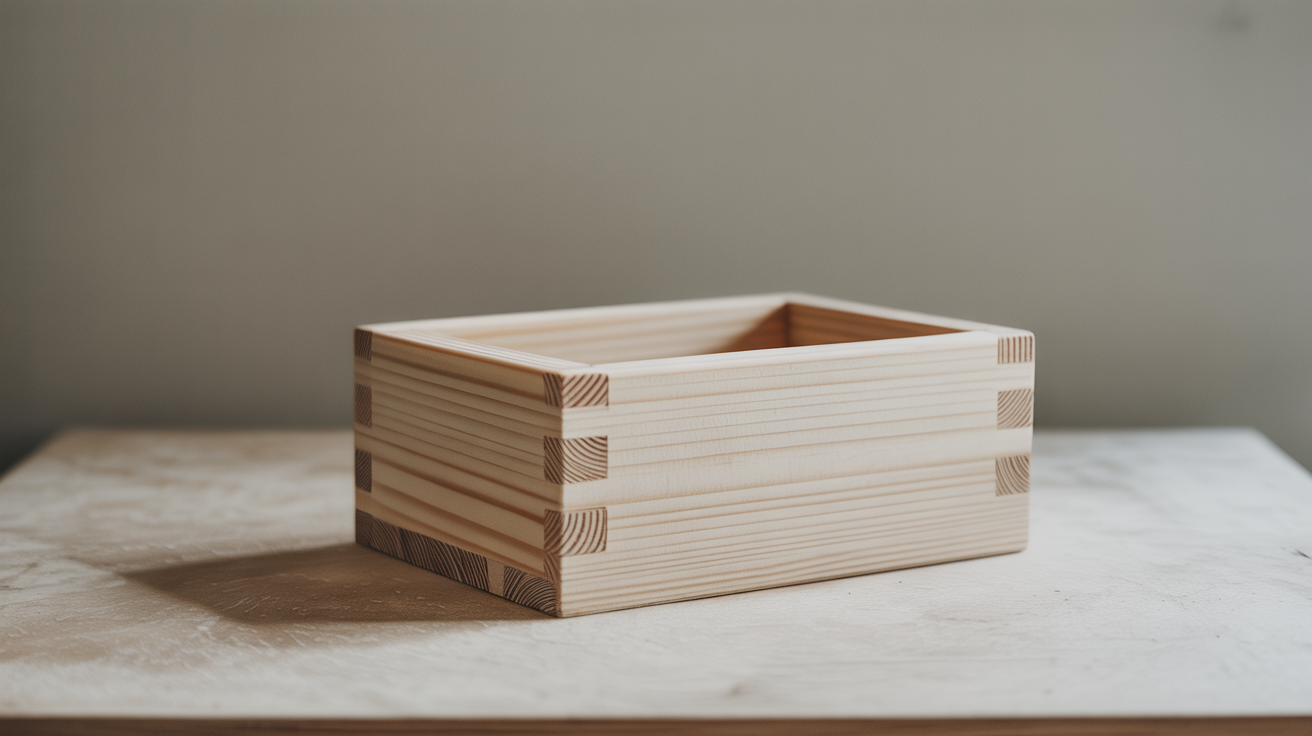
This guide walks through a small keepsake box: 8 inches long, 5 inches wide, and 3 inches tall. That size fits on a desk without being trivial, and the materials cost next to nothing. We'll use mitered corners, which look clean and don't expose end grain on the faces. If you're new to miters, don't worry. This article explains where they go wrong and how to fix it before the glue sets.
Tools and Materials
Tools
- Miter saw (or a hand miter box and backsaw)
- Table saw or circular saw with a straightedge guide
- Tape measure and marking knife
- Combination square
- Router with a 1/4" straight bit (for the lid rabbet) OR a table saw with a dado stack
- Random orbital sander or sanding block
- Clamps: at least four bar clamps or a band clamp
- Painter's tape (used as a tape-hinge during glue-up)
- Pencil and marking gauge
Materials
| Item | Amount |
|---|---|
| 1/2" hardwood (poplar, oak, or maple) | ~3 sq ft |
| Wood glue | Small bottle |
| Sandpaper: 120, 150, 180, 220 grit | One sheet each |
| Danish oil or wipe-on poly | Small can |
| Rare-earth magnets (optional, for lid) | 2 pcs |
| Screws or brad nails (optional reinforcement) | As needed |
Poplar is the easiest pick for a first box: it's cheap, machines cleanly, and takes finish well. Avoid pine if you can. It's soft, dents easily, and tearout on the miter faces can be ugly.
Cut List
This box uses four side pieces with 45-degree miters on the ends, plus a bottom panel that drops into a rabbet. The lid sits on top as a simple lift-off panel, also rabbeted to register into the opening.
| Part | Qty | Dimensions (L x W x T) |
|---|---|---|
| Long sides | 2 | 8" x 3" x 1/2" |
| Short sides | 2 | 5" x 3" x 1/2" |
| Bottom panel | 1 | 7 1/8" x 4 1/8" x 1/4" |
| Lid panel | 1 | 8 1/8" x 5 1/8" x 1/2" |
The bottom is 1/4" plywood or a resawn piece of the same hardwood. It floats in a 1/4"-wide by 1/4"-deep groove cut along the inside bottom edge of all four sides before assembly. The lid overhangs the box by 1/16" on each side and has a shallow 1/8" rabbet around its underside perimeter so it sits in the opening rather than just resting on top.
Build Steps
Step 1: Mill and Cut the Sides
Start with stock that's already 1/2" thick, or joint and plane it to that thickness. Crosscut the four side pieces to rough length, then sneak up on the final dimension with the miter saw. The two long sides should be identical; same for the two short sides.
Set your miter saw to 45 degrees and make one test cut on a scrap before touching the good wood. Check the angle against a reliable square. A miter saw that's slightly off will produce gaps at every corner. Fix it now.
Cut the miters on both ends of all four sides. The outside face is always longer than the inside face. For the long sides, the outside long dimension should land at 8 inches; for the short sides, 5 inches. Take your time dialing this in. A sneak-and-check approach works better than trying to nail it in one cut.
Step 2: Cut the Bottom Groove
Before assembly, run the groove for the bottom panel. Use a router table with a 1/4" straight bit, or a table saw with the blade height set to 1/4". The groove sits 1/4" up from the bottom edge of each side piece.
Run all four side pieces through, holding the bottom edge against the fence. Keep consistent downward pressure. The groove needs to be the same depth and position on every piece or the bottom won't sit flat.
Cut the bottom panel to fit snugly but not tight. Solid wood panels should have a hair of side-to-side room to move with humidity changes. A plywood bottom can be a precise fit.
Step 3: Dry-Fit the Box
Lay the four sides on the bench and do a dry fit before any glue. Tape them together end to end with painter's tape, fold them into a box shape, and check the corners. Hold a small square inside each corner. If a gap opens on the outside of a miter, your angle is slightly over 45 degrees. If the gap is on the inside, it's slightly under. Adjust the saw and recut. Small gaps can be hidden with a touch of glue and sawdust, but visible gaps will bother you every time you look at the finished box.
Drop the bottom panel in and make sure it doesn't push the sides out of square.
Step 4: Glue-Up
This is where band clamps earn their keep. Apply a thin, even coat of glue to both faces of every miter joint. Don't glob it on. Wood glue is strong enough that joint failure almost always happens in the wood, not the glue line, so more isn't better.
Fold the sides back into box shape with the bottom panel dropped into the groove (no glue on the bottom panel). Wrap the band clamp around the perimeter and tighten slowly, alternating sides. Check for square by measuring diagonally across the top opening. If the measurements differ, loosen the clamp slightly and push one corner until they match, then retighten.
Wipe off squeeze-out with a damp rag before it sets. Set the box aside for at least an hour.
Step 5: Cut and Fit the Lid
The lid is a lift-off panel with a rabbet on the underside. Mill the lid piece to 8 1/8" x 5 1/8". That 1/16" overhang on each side looks intentional and makes the lid easy to grip.
Cut the rabbet with a router or table saw. The rabbet depth should match the wall thickness of the box sides (1/2" here), and the width should be roughly 1/4". The goal is a snug push-fit that doesn't need to be pried off. Test it as you go, taking off a little at a time.
If you want to add a pair of rare-earth magnets to keep the lid in place, this is the time. Drill matching holes in the lid and in the box's top edge, press the magnets in with a drop of CA glue, and check the polarity before the glue sets.
Step 6: Sand and Square
Once the glue is fully cured (overnight is safest), sand all four outside faces with 120 grit to flush the corners and remove any dried squeeze-out. Work with the grain. Follow with 150, then 180, then 220. Sand the inside faces before assembly the next time you build a box. This time, use a folded piece of sandpaper or a small detail sander.
Pay attention to the top edges. They need to be flat and coplanar for the lid to register correctly. If one corner is high, a few passes with a hand plane or a flat sanding block will fix it.
Finishing
Danish oil is a good first finish for a beginner. It's forgiving, doesn't require a spray setup, and gives hardwood a warm depth. Wipe it on with a clean rag, let it soak for five minutes, then wipe off the excess. Repeat twice more with 24 hours between coats. Buff lightly with 0000 steel wool between coats.
Wipe-on polyurethane is more durable if the box will see real use. Same application process, but the finish builds up slightly more and is harder to repair if it gets scratched.
Avoid oil-based brushed-on poly for now. It's thick, prone to runs, and the cleanup is more trouble than it's worth on a small project. Save that for flat tabletop panels where a brush stroke or two doesn't matter.
Line the inside with thin craft felt if the box will hold jewelry or anything fragile. A thin bead of white glue around the perimeter holds the felt in place.
What Goes Wrong and How to Fix It
Gaps at the miter corners. Almost always a miter saw that's drifted off 45 degrees. Check the saw's detent stop against a reliable square at the start of every session. A single degree off will produce visible gaps.
The box is out of square after clamping. Catch this before the glue sets by checking diagonal measurements. A band clamp is easier to nudge than four individual bar clamps. If the glue has already cured, a hand plane on the high corner can bring things back into line.
The lid is too tight or too loose. Cut the rabbet in small passes. A lid that's too loose is hard to fix without a patch. A lid that's too tight can be eased with a shoulder plane or sandpaper on a flat block.
Once you've built this box, the construction logic applies directly to larger projects. The same mitered carcase shows up in shelving builds and in the base of a proper workbench. If you have offcuts from the sides, they're perfect material for a small cutting board.
Frequently Asked Questions
What wood is best for a beginner's first wooden box?
Poplar is the top pick for most beginners. It's affordable, widely available at lumber yards and big-box stores, and machines without much tearout. Hard maple and red oak are also good. Avoid softwoods like pine for mitered boxes since the soft grain compresses under clamps and the miter faces tend to tear.
Do I need a table saw to build this box?
No. A hand miter box and a sharp backsaw will cut the 45-degree joints. The bottom groove can be cut with a router and a fence jig. A table saw makes those operations faster, but the joint quality from a well-tuned hand miter box is actually excellent. The workbench build guide includes a section on setting up for hand-tool joinery if you want to go that route.
How do I keep the box square during glue-up?
A band clamp keeps even pressure around all four corners simultaneously and makes it easier to nudge the box into square before the glue sets. Four bar clamps work too, but you need to check and recheck square as you tighten each one. The key measurement: diagonal corner-to-corner distances should match within 1/16".
Can I use butt joints instead of miters?
Yes, and it's actually easier for a first attempt. Butt joints show end grain on the corners, so they look less refined, but they're forgiving and strong with glue. If you go that route, adjust the cut list so the long sides overlap the short sides at each corner, and consider adding brad nails or pocket screws for extra strength while the glue cures.
How long should I wait before removing the clamps?
At least 60 minutes for most PVA wood glues at room temperature, but overnight is safer. The joint reaches full strength after 24 hours. Rushing this and stressing a miter joint that's still soft is one of the most common ways a box comes apart before finishing.