Joinery
Pocket Hole Joinery: Strong, Fast, and Beginner-Friendly
Learn pocket hole joinery: how the jig works, screw selection, where pocket holes shine, and common mistakes beginners make.
Pocket hole joinery has a reputation that precedes it, and for good reason. A jig, a drill, some self-tapping screws, and you can produce a cabinet face frame in under an hour that would take a hand-tool woodworker most of a day. The joint earns real loyalty from beginners because the learning curve is almost flat. That said, it has clear limits, and knowing those limits is what separates a builder who uses pocket holes well from one who regrets them later.
How the Jig Actually Works
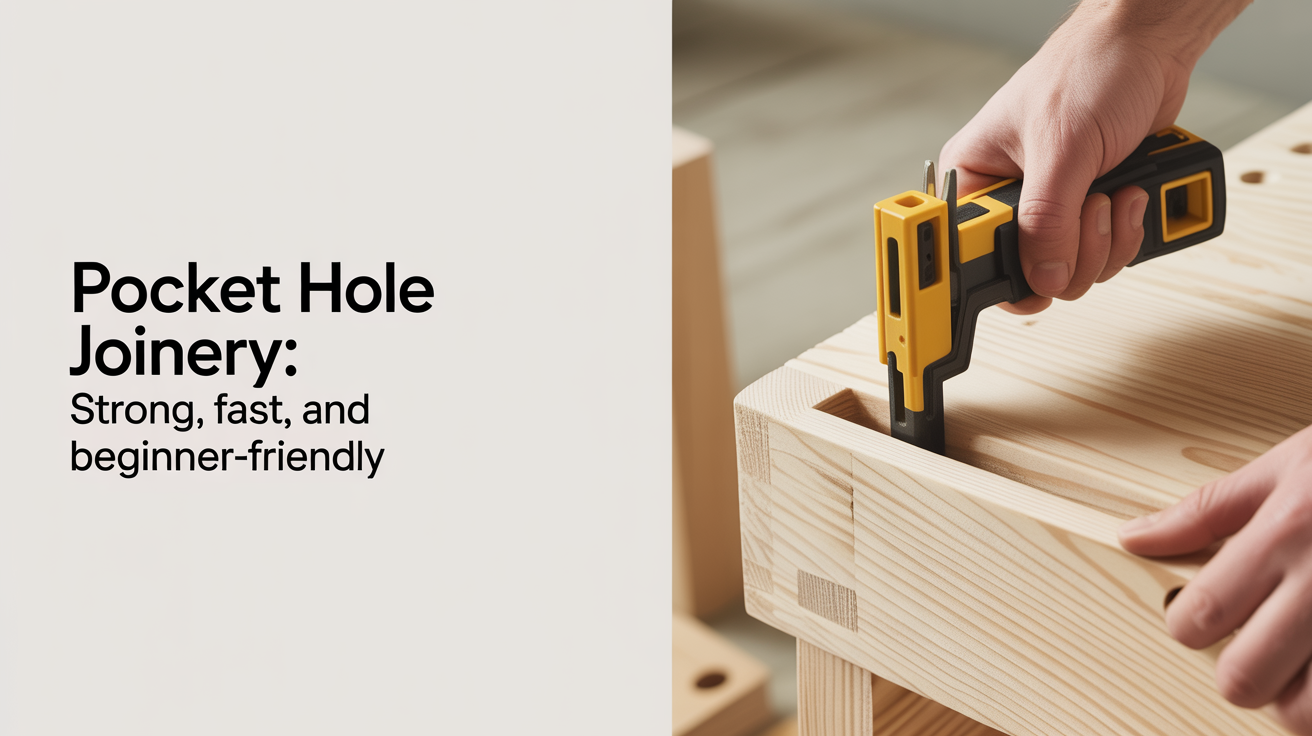
The pocket hole jig guides a stepped drill bit into your workpiece at a fixed angle, typically 15 degrees. The bit is stepped: a wide outer portion bores the pocket, a narrow inner portion drills the pilot hole, and a metal collar clamped on the bit controls the depth so the pocket stops short of the far face. You set that collar by matching it to the thickness of the material you are drilling into, not the material it will be joining. On most Kreg jigs, this is a one-number adjustment marked on the jig body itself.
The screw you drive into that pocket is self-tapping. It pulls the two boards together as it threads in, which means you do not need to drill a pilot hole in the mating piece. Coarse-thread screws are for softwoods and plywood; fine-thread screws are for hardwoods. Using coarse thread in maple tends to strip the pocket, while fine thread in pine sometimes fails to pull the joint tight. Getting this right costs nothing but a moment of attention.
Choosing the Right Screw Length
Screw length depends on material thickness, and guessing wrong produces two distinct failures: a screw that bottoms out before the joint is tight, or one that pokes through the far face. The table below covers the most common situations.
| Material Thickness | Recommended Screw Length | Jig Setting |
|---|---|---|
| 1/2 in (12 mm) | 1 in | 1/2 |
| 3/4 in (19 mm) | 1-1/4 in | 3/4 |
| 1 in (25 mm) | 1-1/2 in | 1 |
| 1-1/2 in (38 mm) | 2-1/2 in | 1-1/2 |
These settings assume standard Kreg-style jigs. If you are using a different brand, check the manual; some set the collar to the combined thickness of both pieces rather than just the drilled piece.
Clamping Before You Drive
This step trips up more beginners than any other part of pocket hole joinery. The screw pulls the boards together in the direction it travels, but that angled pull can also cause the mating face to shift slightly up or down as you drive. Clamp the joint before you pick up the drill. A pair of inexpensive F-clamps across the faces, or a dedicated pocket hole clamp that locks the parts flush, prevents this slip entirely. Without clamping, you finish driving the screw and find the faces are offset by an eighth of an inch, which means more sanding than you wanted.
Glue is optional with pocket holes. For face frames and cabinet boxes, most builders skip it because the screw alone provides enough strength and they may need to disassemble later. For furniture or anywhere you want maximum rigidity, add a thin line of glue to the mating surface before clamping. The screw then acts as a clamp while the glue cures, and the finished joint is meaningfully stronger than either alone.
Where Pocket Holes Perform Well
Pocket hole joinery is genuinely strong in the right applications, and those applications are broad enough to cover a large percentage of what hobbyist woodworkers build.
Good for:
- Cabinet face frames and carcases
- Furniture assembly where pocket pockets are hidden (undersides, backs, interiors)
- Shop jigs and fixtures where speed matters more than appearance
- Toe-kicks, nailers, and blocking inside built-ins
- Attaching tabletops to aprons from below
- Joining sheet goods like plywood and MDF
Not ideal for:
- Joints that will be visible on show surfaces (the pocket is not attractive)
- End-grain to end-grain connections (screws in end grain have poor holding power)
- High-stress structural joints like chair legs and stretchers under body weight
- Fine furniture where traditional joinery is expected or required
If you want to understand why fine furniture makers reach for different methods, reading about mortise and tenon joints gives a useful contrast. Mortise and tenon resists racking forces in a way that a pocket screw cannot match. Similarly, dovetail joints offer mechanical resistance to tension that pocket holes simply do not provide. None of that makes pocket holes inferior for what they do well; it just clarifies the domain.
Common Mistakes and How to Avoid Them
Blowout on the exit face. This happens when the jig is set for thicker stock than what you are actually drilling. The bit travels too far and punches through. Always verify the jig setting with a scrap of the same material before drilling your actual parts.
Screw poking through. The flip side of blowout. Using a screw that is too long, or forgetting to match screw length to material thickness, drives the tip out the far side. On a cabinet box, that tip is now visible inside. Match your screw length to the table above and you avoid it.
Drilling in the wrong face. The pocket should always end up on the hidden side of the joint. Rushing and drilling the show face is a quick way to ruin a board. Mark the hidden faces with a pencil X before you touch the drill.
Over-tightening. The self-tapping tip makes it easy to keep driving past the point where the joint is tight. Strip the pocket and the joint loses most of its strength. As soon as the joint pulls flush, stop. Driving with a drill clutch set conservatively helps, especially in softwood.
For a comparison with a simpler joint that has its own set of tradeoffs, see how a well-made butt joint stacks up. Pocket holes are essentially a mechanical upgrade to that concept, using the angled screw to provide the clamping force that glue and nails supply in a traditional butt joint.
Building a Face Frame Start to Finish
A cabinet face frame is the classic pocket hole project, and walking through the sequence makes the workflow concrete. Start by cutting your stiles and rails to final length. Drill pockets on the ends of all rails, with the pockets facing the back of the frame. Apply glue to the mating surfaces if you want a permanent assembly, then clamp each rail to its stile with the faces flush. Drive the screws. Work from the center outward so any accumulated error exits at the corners rather than creating a gap in the middle. Check for square by measuring diagonals. The whole frame for a standard base cabinet takes about fifteen minutes once you have the parts cut.
That pace is why Kreg joinery became nearly synonymous with cabinet building in the maker community over the past two decades. The jigs are inexpensive, the consumables are cheap, and the results are consistent enough for painted work without any real practice period. Stained or clear-finished work requires more planning around pocket placement, but that is a constraint you can work with rather than around.
Frequently Asked Questions
How strong is a pocket hole joint compared to a mortise and tenon?
In shear, a pocket hole joint is surprisingly close to a mortise and tenon for cabinet-grade work. Testing by Kreg and independent woodworkers shows face frames and box joints holding well under typical furniture loads. Where the pocket hole falls behind is in tension, meaning pulling the pieces apart end-to-end, and in resisting racking forces over years of use. For chairs and tables that flex with body movement, mortise and tenon is a better choice.
Do I need to use glue with pocket hole screws?
Not always. For shop fixtures, site-built cabinets, or anything you might need to disassemble, screws alone are fine. For furniture, adding glue increases long-term rigidity and reduces the chance of the joint creaking as the wood moves seasonally. The screw holds everything aligned while the glue cures, so you get the convenience of mechanical fasteners with the durability of an adhesive joint.
Can I use pocket holes with plywood?
Yes, and it works well. Plywood is dimensionally stable and the screws bite into the laminations reliably. Use a coarse-thread screw as you would for softwood, and make sure your jig setting matches the actual plywood thickness, which is often slightly under the nominal size (3/4 inch plywood frequently measures 23/32 inch).
What is the difference between Kreg and generic pocket hole jigs?
Kreg jigs are well-machined, durable, and have a large accessory ecosystem. Generic jigs from other brands work on the same principle and can produce clean results at lower cost. The main practical difference is tolerance: tighter machining on the guide bushing means the bit wobbles less, which matters when you are drilling close to an edge. For occasional use, a generic jig is fine. For high-volume work, the Kreg holds up better over time.
Why does my screw keep stripping the pocket?
Usually one of three causes: using coarse-thread screws in hardwood, driving too fast with the clutch set too high, or using an undersized pilot. In hardwood, switch to fine-thread screws. Reduce your drill's clutch setting so it disengages just as the joint pulls flush. If the pocket itself is damaged, that board needs to be redrilled in a fresh spot; a stripped pocket does not recover.