Projects & Plans
Build a Cutting Board From Scrap Wood
Turn hardwood offcuts into a beautiful, food-safe cutting board. Step-by-step guide to glue-up, flattening, edge rounding, and finishing with mineral oil.
A cutting board is one of the most satisfying things you can build from offcuts. The whole project costs almost nothing if you've got a few hardwood scraps lying around, and the finished board is something you'll actually use every day.
The key is choosing the right wood and the right glue. Get those two decisions right, and the rest is straightforward woodworking.
Tools and Materials
Wood
Stick with dense, closed-grain hardwoods that won't harbor bacteria or absorb excessive moisture. Good choices:
- Hard maple (the classic choice)
- Black walnut
- Cherry
- Beech
- Teak (though it dulls blades faster)
Woods to avoid for food contact: open-grained species like oak and ash trap food particles. Skip reclaimed pallet wood entirely; many pallets are treated with methyl bromide or other fumigants that have no business near food. Avoid pine, cedar, or any resinous softwood.
Glue
You need a waterproof glue. Titebond III is the standard pick for cutting boards. It's Type III water-resistant, food-safe once cured, and widely available. Titebond II (Type II) is also acceptable. Standard yellow woodworking glue is not waterproof and will fail.
Tools
- Table saw or circular saw with a ripping fence
- Random orbital sander (or hand plane)
- Router with a round-over bit, or 80-grit sandpaper for easing edges
- Clamps (bar or pipe clamps work best for glue-ups)
- Cutting board oil (food-grade mineral oil, available at pharmacies)
- Beeswax/oil paste or Howard's Butcher Block Conditioner for topcoat
Cut List
The board below is built from edge-grain strips, each 3/4 in. thick. Edge grain means the face you see is the long edge of the board, not the wide flat face. Edge grain is durable and flat-stable; end grain is even harder on knife edges but requires more material and more flattening work.
| Part | Width | Length | Qty | Notes |
|---|---|---|---|---|
| Maple strip | 1-1/2 in. | 12 in. | 4 | or adjust to available scraps |
| Walnut strip | 1-1/2 in. | 12 in. | 3 | for contrast |
| Glued panel | ~10-1/2 in. | 12 in. | 1 | after glue-up |
Rip your scraps to a consistent width on the table saw before anything else. Inconsistent widths make the glue-up a nightmare. A 1-1/2 in. finished width per strip is a reasonable target, but any consistent dimension works.
Build Steps
1. Mill and Sort Your Strips
Joint one face of each strip flat if you have a jointer. No jointer? Run each piece over the table saw with the flattest face down, then sand to remove saw marks. Arrange the strips so the grain patterns alternate. If you look at the end grain, flip adjacent strips so the growth rings curve in opposite directions. This helps the panel resist cupping as humidity changes.
Lay them out dry, mark the arrangement with a triangle across the faces so you can reassemble in order, and confirm everything looks right before glue touches anything.
2. Glue Up the Panel
Apply a thin, even coat of Titebond III to each mating face. Too much glue makes cleanup miserable and adds nothing structurally. Too little leaves dry spots. A foam roller or a chip brush spreads it evenly.
Set the strips on a flat surface or in your clamps. Apply clamping pressure until glue squeezes out uniformly along every joint. Wipe squeeze-out with a damp rag while it's wet; dried glue requires a chisel. Check that the panel hasn't bowed under clamp pressure by sighting across it. If it's lifting in the middle, add a clamp perpendicular across the top.
Leave it for at least 30 minutes before unclamping, longer if your shop is cool. Full cure is 24 hours.
3. Flatten the Panel
After the glue cures, the panel will almost certainly have some ridges at the joints and maybe a slight twist. A hand plane (No. 4 or No. 5) removes these fast. Work diagonally across the grain first to knock down high spots, then finish with the grain direction. A cabinet scraper gets the last bit of tearout.
No hand plane? A random orbital sander starting at 80 grit will get you there, just more slowly. Progress through 80, 120, 180, and finish at 220. Dust between grits.
Flip the board and flatten the back the same way. You want both faces flat and parallel, not just the top.
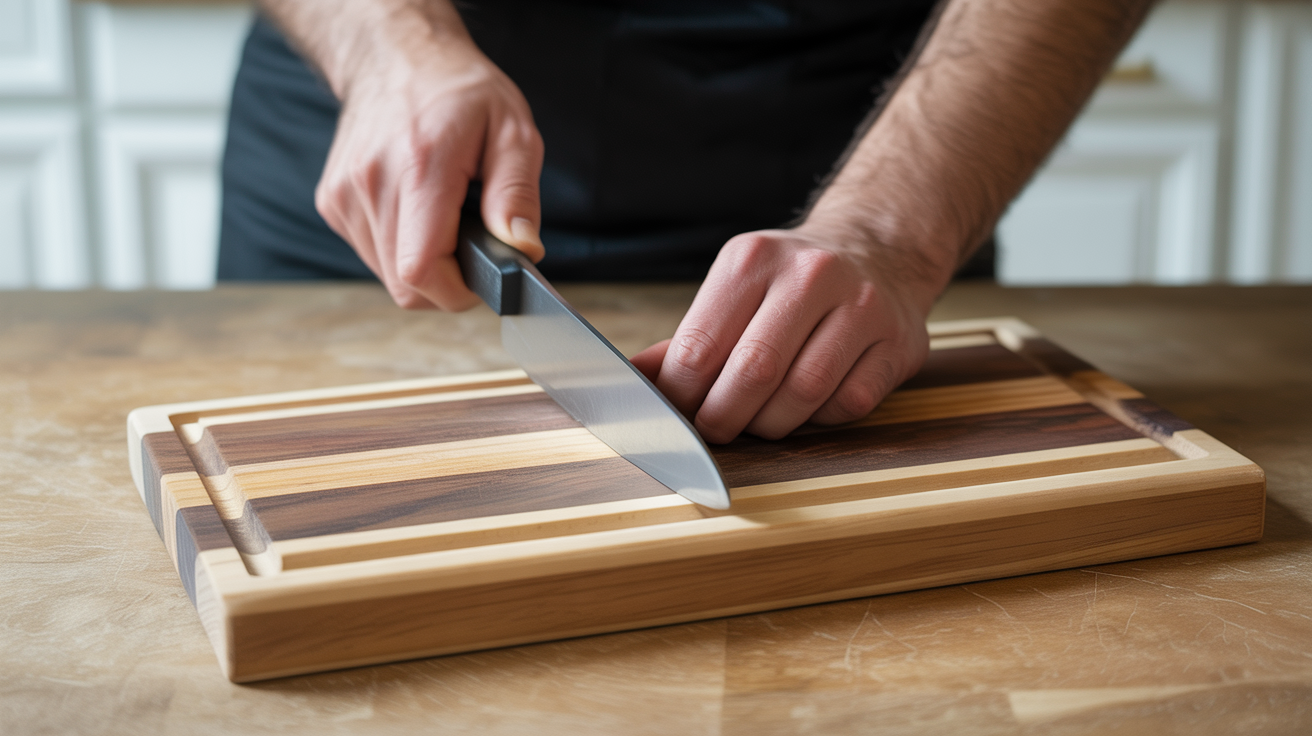
4. Cut to Final Size and Round the Edges
Trim the ends square on the table saw or with a crosscut sled. A cutting board does not need to be any particular size, so cut to whatever looks right given your strips.
Sharp square edges on a cutting board are uncomfortable to grip and chip over time. Round them over with a 1/4 in. round-over bit in a router, or simply sand them with 80-grit paper held at 45 degrees, then blend with 120 and 180. The corners where two edges meet need a little extra attention with sandpaper.
Sand all faces to 220 grit. Blow off the dust.
5. Finish with Mineral Oil and Paste Wax
Food-safe mineral oil is the standard first finish for a cutting board. It's inexpensive, odorless, flavorless, and will never go rancid. Avoid olive oil, vegetable oil, or coconut oil; they oxidize and turn rancid inside the wood over time.
Apply a generous coat of mineral oil and let it soak in for 20 minutes. Wipe off the excess. Repeat until the wood stops absorbing oil readily, which usually takes three to four coats over a couple of days. The wood will noticeably darken and stop looking thirsty.
Once the oil is done, apply a thin coat of beeswax paste or butcher block conditioner. Buff it in with a rag and let it dry to a matte sheen. This topcoat sits on the surface and provides a little moisture resistance between oil applications.
Care Notes
Hand wash only. Submerging a cutting board in water or running it through a dishwasher will cause the joints to fail, eventually. Wash with warm soapy water, rinse, and dry immediately with a towel. Stand it on edge to air-dry so both faces can breathe.
Re-oil every few months, or whenever the wood looks pale and dry. A minute of work keeps the board going for years. If the surface develops knife scars over time, a light sand at 180 grit followed by fresh oil brings it back.
Store flat or on edge, never leaned at an angle where it can slowly warp.
A simple project like this is also a good stepping stone toward more complex builds. If you're new to the shop and want a confidence-building project before the glue-up, see Build a Simple Wooden Box for a clean introduction to basic joinery. Once you're ready for a bigger commitment, How to Build a Sturdy Workbench gives you a proper surface to work from. And if you want to keep practicing with solid wood but need something with more visual drama, Make a Bookshelf from a Single Board is worth a look.
Frequently Asked Questions
What wood is best for a DIY cutting board?
Hard maple is the go-to choice. It's dense, closed-grain, widely available, and takes a beautiful finish. Cherry and walnut are excellent if you want contrast strips. Beech is a budget-friendly alternative that performs well. The main thing is sticking to closed-grain hardwoods; open-grained species like red oak trap food debris even after cleaning.
Do I need a jointer and planer to make a cutting board?
No, though they help. A table saw with a ripping fence handles most of the milling if your blanks are already reasonably flat. A hand plane is a capable substitute for a jointer if you're comfortable with one. The flattening step after glue-up can be done entirely with a random orbital sander, it just takes longer.
Can I use construction lumber from the hardware store?
Pine and Douglas fir are too soft for a cutting board that will actually be used. Knife marks go deep, the surface degrades fast, and the open grain is hard to keep clean. Some hardware stores carry hardwood boards (maple and poplar are common), which work fine. The poplar is on the softer end of acceptable; maple is the better pick.
How long does the finish last?
Mineral oil is a maintenance finish, not a one-time treatment. Plan to re-oil every few months in normal use, or sooner if the board starts to look pale. The beeswax topcoat extends the interval a little. A board that gets oiled regularly will last decades; one that gets neglected will dry out and eventually crack at the joints.
Is edge grain better than end grain?
Both work well. Edge grain is easier to build, requires fewer strips, and stays flatter with less fussing. End grain is harder on knife edges (the blades slip between the fibers rather than cutting across them), which means less knife dulling and a self-healing surface, but end grain boards are thicker, heavier, and harder to flatten after glue-up. For a first board, edge grain is the right starting point.