Joinery
How to Make a Strong Butt Joint
Learn how to cut, reinforce, and glue a butt joint in wood. Covers end-grain vs edge-grain gluing, dowels, biscuits, pocket screws, and clamping tips.
The butt joint is the most stripped-down connection in woodworking: two pieces of wood, ends meeting face. No interlocking geometry, no mechanical complexity. That simplicity is useful in the right context and a liability in the wrong one, and understanding exactly why makes the difference between furniture that lasts and a box that falls apart at a seam.
Start with the basic physics, then build from there.
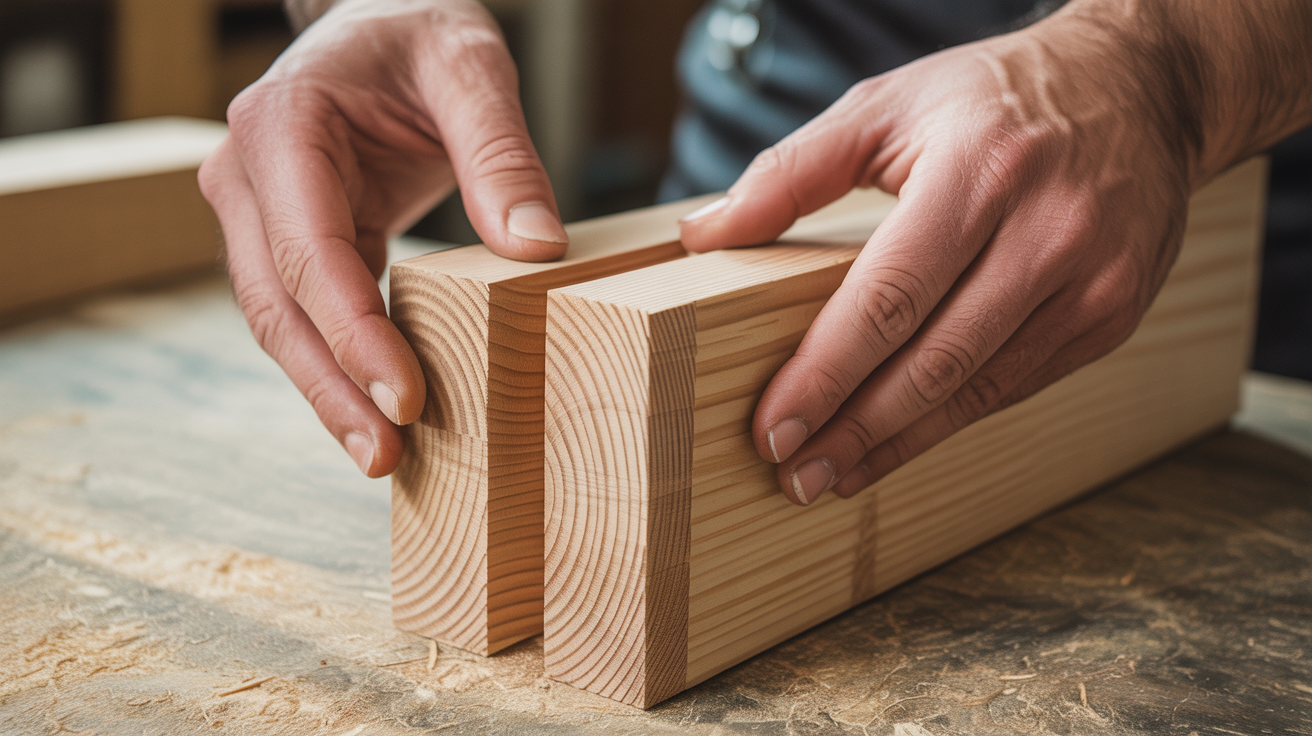
Why End-Grain Butt Joints Are Weak
When you push two boards together end-to-end, you're joining end grain to end grain. End grain is wood's vascular tissue in cross-section: open tubes running along the length of the fiber. Liquid glue wicks straight into those tubes instead of bonding at the surface. The result is a joint starved of adhesive at the actual contact zone, often called a "dry joint" even when plenty of glue was applied.
Beyond absorption, end grain offers almost no long-grain fiber overlap. PVA wood glue forms its strongest bond between long-grain faces, where the glue cures into a film anchored in the wood's surface rather than getting sucked away. An end-grain-to-end-grain glue joint has a fraction of the strength of a face joint between the same two pieces. Structural engineers treat it as near zero in tensile strength calculations, and so should you.
That does not mean butt joints are useless. It means they need mechanical support when load will be applied.
When a Plain Butt Joint Is Acceptable
Some applications carry so little stress that an unreinforced butt joint holds perfectly well. Interior trim and casing, for instance, gets nailed into framing and rarely sees direct pull force. Small decorative boxes with thin stock can use corner butt joints with glue and a few brads when the box will not be used as a container for anything heavy. Assemblies that will be fastened into a larger structure, rather than standing alone, often rely on the structure itself to carry the load.
The test is simple: if the joint will carry weight, experience racking, or be stressed by repeated use, reinforce it. If it sits glued and fastened into a fixed assembly and stays there, a butt joint may be enough.
The One Butt Joint That Is Genuinely Strong: Edge-to-Edge Gluing
Here is where the butt joint's reputation deserves serious rehabilitation. An edge-to-edge panel glue-up is technically a butt joint at every seam, and those joints routinely outperform the wood around them. Cut a properly glued panel and the wood fibers typically fail before the glue line does.
The reason is long-grain contact. When you join boards along their edges, you're putting long-grain face against long-grain face across the entire mating surface. Glue bonds here as designed: it cures flat against the fiber surface, not into an absorptive tube. A well-fitted edge joint with adequate glue and clamping pressure produces a connection that is structurally part of the wood.
Edge gluing is the standard method for building wide panels from narrower stock. A mortise-and-tenon joint gives you a mechanical interlock for frame members; edge gluing gives you a solid panel. Different tools for different problems.
Reinforcing an End-Grain Butt Joint
When you need a corner or T-joint and a butt joint is the practical choice, reinforcement brings mechanical strength that glue alone cannot provide. The table below compares the common options.
| Method | Strength Added | Skill Level | Best For |
|---|---|---|---|
| Pocket screws | High | Beginner | Face frames, furniture carcasses, shop jigs |
| Dowels | Medium-High | Beginner-Intermediate | Cabinet corners, workbench assemblies |
| Biscuits | Medium | Intermediate | Alignment + moderate strength, panel seams |
| Splines | Medium-High | Intermediate | Long grain-to-grain seams, continuous alignment |
| Metal brackets | High | Beginner | Shop furniture, utility shelving, hidden applications |
Pocket screws draw the joint tight as they drive and add shear resistance that glue cannot. Pocket-hole joinery is the go-to for face frames and carcass work precisely because it handles assembly quickly without clamps or a waiting period. The trade-off is visible hardware unless you plug the holes, and the joint relies on the screw threads holding in end grain, which varies by wood species and density.
Dowels and biscuits both require alignment during dry-fit and cannot be adjusted once the glue sets, but they add meaningful resistance to racking and shear. Splines are a step up in preparation because you need a slot in both mating faces, but the continuous spline along the joint length is very effective for anything that sees lateral stress.
Metal corner brackets and flat mending plates are underrated in shop furniture. They look utilitarian because they are, but for a workbench torsion box or a lumber storage rack, a pair of heavy-duty corner brackets makes the joint bomb-proof at low cost and near-zero skill barrier.
How to Cut and Prep Mating Surfaces
The joint is only as strong as the fit. A gap in a glue line means the adhesive bridges rather than bonds, and a bridging glue joint is weak.
For a corner butt joint, square ends matter most. Use a miter saw or table saw rather than a hand saw unless you have a shooting board and can true the cut with a hand plane. Check the end for square in both directions before glue-up.
For edge-to-edge joints, the mating edges must be straight and square along their full length. A jointer handles this in a single pass. Without a jointer, a hand plane on a winding-free edge does the job. Run both boards together against a straight-edge after jointing to confirm the seam closes without light gaps.
Flatten any mill marks, snipe from a planer, or rough saw texture on the faces that will mate. Glue bonds to fiber, not to surface debris.
Edge Gluing: A Checklist for a Tight Panel
The following steps apply to any edge-to-edge panel glue-up, whether you are laminating two boards or eight.
- Joint or plane every mating edge until it reads straight and square with no light gap between paired boards
- Alternate annual ring direction (bark-side up, bark-side down) on adjacent boards to reduce cupping across the panel
- Do a complete dry-fit before applying glue; check for gaps, confirm clamp positions, and mark board orientation with triangle marks
- Apply glue to both mating edges, not just one; this ensures full coverage without relying on squeeze-out to fill the gap
- Spread glue evenly with a brush or roller; a bead down the center of one edge tends to leave dry spots at the outer faces
- Use cauls (straight clamping boards) across the face of the panel at each clamp position to keep boards aligned and prevent buckling under pressure
- Apply clamping pressure until squeeze-out appears continuously along the full seam length; too little pressure leaves glue-starved gaps
- Let squeeze-out gel to a rubbery consistency before scraping it off; cleaning wet glue smears it into the grain and raises the surface around the seam
A properly executed edge glue-up typically needs no reinforcement. Adding dowels or biscuits for alignment is fine; adding them because you distrust the glue joint usually means the joint preparation needs more attention instead.
Clamping Pressure and Glue Coverage
More clamping pressure is not always better. Excessive pressure squeezes out too much glue and leaves the joint glue-starved, the same result as too little. The goal is firm, consistent pressure that closes the seam and produces a thin, continuous bead of squeeze-out.
For edge glue-ups, a clamp every 12 to 16 inches is a reasonable starting point on boards up to 6 inches wide. Longer spans or warped stock may need more. Alternate clamps above and below the panel to balance the clamping force and prevent the panel from bowing under load.
PVA (yellow carpenter's glue) has roughly a 15-minute open time in normal shop conditions, less in heat. Work quickly on long glue-ups or use slow-set PVA for panels with many boards. For joints that need a longer assembly window or extra water resistance, liquid hide glue remains a strong option.
If you are making a corner joint that will also be reinforced with dovetail joinery or another mechanical method on a different axis, the butt joint becomes part of a compound connection, which changes the strength calculus considerably.
Frequently Asked Questions
Is a butt joint strong enough for a bookcase?
A bookcase carcass with butt joints depends heavily on how the joints are reinforced and whether the back panel is glued and nailed in place. Pocket screws or dowels at the corners, combined with a solid back panel that ties the case together, produce a bookcase that holds up well. Without a back, or with glue alone, corner butt joints on a loaded case will eventually rack.
How do I keep glued-up boards from slipping while clamping?
Edge joints want to slide as clamping pressure goes on. Dowels or biscuits at two or three points along the seam prevent this with no extra clamping effort. An alternative is to drive a small finish nail slightly into one edge, snip the head off, and let the resulting spike register into the opposite board during assembly. Remove it after the glue sets if it is accessible.
Should I sand the surfaces before gluing?
Not the mating surfaces. Sanding introduces fine dust into the grain and can create a slightly convex surface from orbital scratches, both of which reduce glue contact. Joint or plane to a clean, flat face and glue directly. Sand the exterior faces for appearance after the assembly is complete.
What glue works best for butt joints?
For interior woodworking, standard PVA (Titebond Original or Titebond II) is the practical answer. Titebond II adds water resistance for anything that may see humidity changes. Avoid super glue or construction adhesive for structural joints; PVA properly applied to long-grain surfaces outperforms both for wood-to-wood bonds.
Can I reinforce a butt joint after it is already assembled?
Yes, though the options are limited. Metal brackets can be added after the fact and work well in utilitarian applications. Corner blocks glued into the inside corner add meaningful racking resistance when the outside of the joint is not visible. Driving screws through the face and into end grain is possible but weaker than pocket screws driven at an angle; pre-drill to avoid splitting.