Joinery
The Mortise and Tenon Joint, Explained
Learn how to cut a mortise and tenon joint, why it's one of the strongest wood joints, and how to get a snug, glue-ready fit every time.
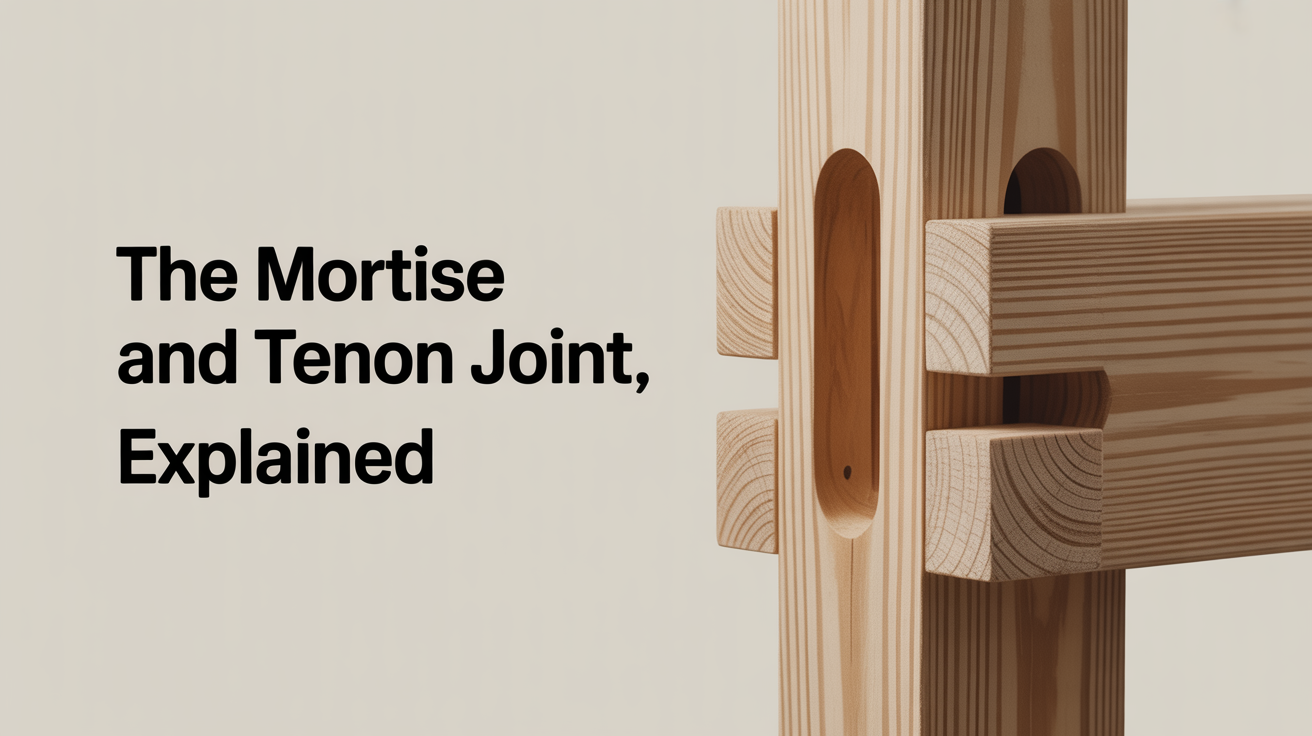
The mortise and tenon joint has held furniture together for thousands of years, and woodworkers still reach for it whenever a joint needs to last. It pairs a rectangular hole (the mortise) with a projecting tongue (the tenon) cut on the mating piece, and the result is a connection that resists racking, pulling apart, and the slow creep of seasonal wood movement better than almost anything else in the shop.
Two things make it so durable. First, the tenon cheeks are long-grain surfaces pressing against long-grain mortise walls, giving glue the best possible surface to grip. Second, the tenon physically interlocks inside the mortise, so the joint has mechanical resistance even before the glue sets. That combination is why chairmakers and frame-and-panel builders have relied on it for centuries.
Start With the Mortise
The order of operations matters here: cut the mortise first, then fit the tenon to it. Mortises are harder to sneak up on because you're removing material from inside a board with limited visibility. The tenon, by contrast, is easy to pare down with a chisel until the fit is right.
Mark the mortise with a mortise gauge set to match your chisel width. Two parallel scribe lines define the walls; keep them centered on the stock unless you have a structural reason to offset them. A centered mortise also means you can register the gauge off either face and get a consistent layout.
Chopping the mortise by hand is satisfying and very accurate for shorter work. Work in from both ends toward the center, levering out chips rather than trying to drive the chisel straight down to full depth in one pass. Blown-out mortise walls are the main failure mode here, usually caused by levering too hard near the end grain at the rim. Stay about 3 mm back from your layout lines until the bulk of the waste is gone, then pare to the line.
Drilling out the waste with a Forstner bit before chopping is faster on longer or deeper mortises. Set the drill press fence so the bit stays centered, drill overlapping holes just shy of final depth, then chop and pare the walls square. Either approach works; the goal is four flat walls and a clean bottom.
The One-Third Rule for Tenon Thickness
Tenon thickness should be roughly one-third the thickness of the tenon stock. On a 19 mm (3/4-inch) rail, that means a tenon about 6 mm thick. Go thinner and the tenon is fragile; go thicker and the mortise walls become dangerously thin and prone to splitting. This is the single most important proportion to get right.
Tenon length is governed by the mortise depth, which in turn depends on how much meat you have in the mortised piece. A rule of thumb is that mortise depth should not exceed five times the mortise width, but in practice you want as much glue surface as the stock allows without weakening the surrounding wood.
Mark the tenon shoulders all the way around the stock with a marking knife and a square before picking up a saw. Shoulders define the finished face of the joint and are what you see when the joint closes, so they need to be crisp and square. The cheeks are the long-grain surfaces that fit the mortise walls.
Sawing the Tenon
A tenon saw or a rip-filed hand saw works well for the cheek cuts. Cut on the waste side of the line, keeping the saw tracking with the grain, and check the face of the cut frequently with a square. It is easier to remove a little more wood than to put it back.
The shoulder cuts come next. These are crosscuts, and a fine-tooth saw leaves a cleaner surface than a coarse one. Saw right to your knife line. If you used a marking knife to score the shoulder, the wood fibers are already severed and the saw will register cleanly.
Fit the tenon to the mortise gradually. A snug "piston" fit, where the tenon slides in under hand pressure with no wobble, is the target. If it binds, find the shiny high spots on the tenon cheeks (they'll catch the light) and pare those spots with a sharp chisel. A loose fit is the other failure mode: the joint will hinge open under load, the glue layer will be too thick to hold well, and the piece will fail long before its time.
Mortise and Tenon Variations
Different applications call for different forms of the joint. Here's how the most common variations differ:
| Variation | Mortise depth | Tenon exits the far face? | Best use |
|---|---|---|---|
| Through tenon | Full thickness of mortised piece | Yes | Trestle tables, visible joinery, wedged connections |
| Blind (stub) tenon | Partial depth only | No | Cabinet frames, legs to rails where you want no exposed end grain |
| Haunched tenon | Full depth plus a small shoulder at the top of the tenon | No | Frame-and-panel doors, where the groove for the panel continues past the mortise |
| Wedged (drawbored) tenon | Full thickness | Yes (wedged) or No (drawbore) | Maximum mechanical lock, no reliance on glue alone |
A wedged through tenon is worth understanding even if you don't use it often. After the tenon passes through the mortised piece, saw kerfs into the tenon end and drive small wooden wedges into them. The wedges flare the tenon, making it impossible to pull back through the mortise without destroying the joint. It's a permanent mechanical lock.
Gluing Up
For most furniture joints, standard PVA wood glue is plenty. Apply glue to the mortise walls and the tenon cheeks, not to the shoulders. The shoulders should close tight on dry wood. If glue squeezes out of the shoulder line, wipe it off before it skins over; squeeze-out at the bottom of the mortise is not a problem.
Clamp across the joint while the glue cures, checking that the assembly is square before you walk away. A twisted or racked frame is much harder to fix after glue-up than before.
For the related skills of cutting joints without glue, see how to cut dovetail joints by hand or compare the strength trade-offs in how to make a strong butt joint. If you need something faster and still strong, pocket-hole joinery is worth a look for shop jigs and secondary frames.
What Can Go Wrong (and How to Fix It)
- Loose fit: Pare the mortise walls with a router plane or shoulder plane to create clean, parallel surfaces, then glue a thin shim of matching wood to the tenon cheek before re-fitting. Do not try to fix a sloppy joint with extra glue.
- Blown-out mortise wall: Glue the fragment back, let it cure fully, then re-chop the mortise carefully. Alternatively, plug the mortise with a glued patch and start over.
- Twisted shoulders: The tenon is skewed on its stock. Pare the high shoulder corner with a chisel until both shoulders seat flat simultaneously.
- Tenon too short: The mortise depth was cut too long, or you made an error in layout. Re-glue a tenon extension to the end, let it cure, then re-cut to length before fitting.
Frequently Asked Questions
How tight should the mortise and tenon fit be before glue?
The tenon should slide into the mortise under firm hand pressure with no rocking or play. If you need a mallet to seat it dry, the fit is too tight and the wood may split when you add glue (which swells the wood slightly). If it drops in under its own weight, it's too loose.
What's the difference between a blind mortise and a through mortise?
A blind (or stub) mortise stops before it exits the far face of the board. A through mortise goes all the way through. Through mortises are stronger because the tenon can be longer, and they allow wedging. Blind mortises are cleaner looking and are used wherever you don't want to see the tenon end grain on the outside of the piece.
Can I cut a mortise and tenon joint with power tools?
Yes. A hollow-chisel mortiser cuts the mortise cleanly in a drill-press-like setup. A table saw with a dado stack or a tenoning jig handles the tenon cheeks and shoulders. The same fit principles apply regardless of how the cuts are made.
Does the one-third rule apply to all wood thicknesses?
It's a reliable starting point for typical furniture stock between 19 mm and 38 mm thick. On very thin stock (under 12 mm), a slightly thicker-proportion tenon is sometimes used. On very thick timbers in timber framing, the proportions shift based on structural load rather than a fixed ratio. For furniture work, one-third is the number to start with.
Do I need to use glue with a mortise and tenon joint?
Glue adds significant strength, but a well-fitted wedged or drawbored mortise and tenon joint will hold under load without it. Traditional Japanese joinery relies on mechanical fit rather than adhesive. For Western furniture that will see daily use, glue is standard practice and adds insurance against slow movement over years.