Power Tools
How to Use a Pocket Hole Jig
Learn how to set up and use a pocket hole jig correctly: drill depth, screw length, and clamping tips for solid, gap-free joints every time.
A pocket hole jig drills an angled hole into one workpiece so you can drive a screw through it into a second piece, pulling the joint tight from the inside. Once you understand the three setup variables (drill collar depth, jig height, and screw length), the whole process takes about two minutes per joint.
What a Pocket Hole Jig Actually Does
The jig guides a stepped drill bit at a fixed 15-degree angle. That bit cuts two things at once: a narrow pilot hole for the screw shank, and a wider counterbore at the surface where the screw head sits. The result is a pocket, shaped like a small elongated cavity, that hides the screw head completely once the joint is assembled.
This style of joinery is popular for face frames, cabinet carcasses, furniture rails, and sheet goods because it is fast, requires no glue clamps on the joint itself, and leaves a clean face side. It is not the strongest joint in the shop, but for most furniture and cabinet work it holds reliably if the settings are right.
The Kreg Jig is the most common brand, and kreg jig basics translate almost exactly to other pocket hole jigs on the market because the geometry is the same across manufacturers.
Setting the Jig for Your Material Thickness
This is the step beginners most often skip, and it is the one that causes gaps and blowout. Both the drill bit collar and the jig's guide block need to be set to match the thickness of the workpiece you are drilling into, not the workpiece you are joining to.
Adjusting the Drill Bit Collar
The stepped drill bit has a metal stop collar that controls how deep the pocket goes. Loosen the set screw on the collar, slide it to the mark on the bit that matches your material thickness, and retighten. Most Kreg bits have laser-etched depth marks labeled in fractions (3/4, 1/2, 1-1/2, and so on). Set it to the thickness of the board receiving the pocket hole.
If the collar is set too shallow, the screw will not pull tight. If it is too deep, the tip will blow through the face of the board.
Setting the Jig Height
The jig itself has a stepped block with labeled positions, usually A through F on older Kreg models, or marked by thickness on newer ones. Loosen the thumb knob, slide the guide block to the correct thickness mark, and lock it down. This positions the entry angle so the screw tip lands in the center of the mating piece rather than near the edge or past the far face.
A quick rule: both settings use the same number. If you are drilling 3/4-inch material, set both the collar and the guide block to 3/4 inch.
Choosing the Right Screw
Pocket hole screws are not standard wood screws. They have a flat, washer-style head, a coarse or fine thread pattern, and a self-tapping tip. Using the wrong screw is probably the second most common source of failed joints.
Screw Length and Material Thickness
Screw length is determined by the combined thickness of both workpieces, not just the drilled piece. Use this table as a starting point:
| Workpiece Thickness | Screw Length |
|---|---|
| 1/2 in (12 mm) | 1 in |
| 3/4 in (19 mm) | 1-1/4 in |
| 1 in (25 mm) | 1-1/2 in |
| 1-1/2 in (38 mm) | 2-1/2 in |
These lengths assume both pieces are the same thickness. If the mating piece is thicker, you can go up one size. If it is thinner, stay at the standard length or go shorter; a screw that protrudes through the far face cannot be fixed after assembly.
Coarse Thread vs. Fine Thread
Pocket hole screws come in two thread patterns, and choosing wrong gives you a weaker joint or stripped threads.
Coarse thread screws have wide, aggressive threads spaced farther apart. Use these for softwoods (pine, cedar, poplar) and for sheet goods like plywood or MDF. The coarse thread bites into softer fibers and creates more holding power in those materials.
Fine thread screws have tighter, closer-spaced threads. Use these for hardwoods (oak, maple, cherry, walnut). Fine threads resist stripping in dense grain and pull the joint flush without tearing the wood fibers.
A fast way to remember it: soft material needs coarse thread, hard material needs fine thread.
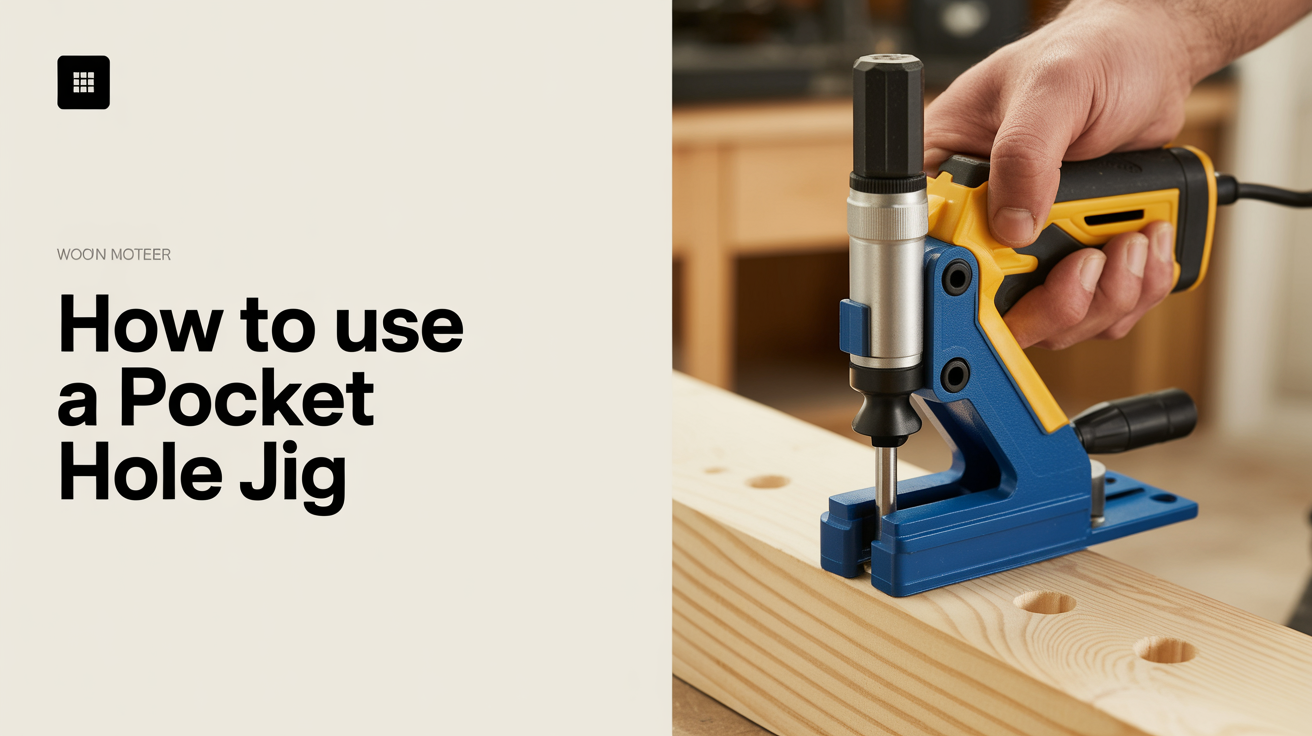
Drilling the Pocket Holes
Position the jig on your workpiece with the guide holes facing up and the flat base flat against the wood surface. Clamp the jig down using its built-in clamp or a regular bar clamp if your model does not have one. The jig should not move at all during drilling.
Set your drill to a moderate speed, not the fastest setting. High RPM generates heat and can cause the bit to drift. Insert the stepped bit into the guide hole, press the collar against the guide block, and drill in one smooth pass. Let the bit do the work. Do not force it down or twist the drill laterally.
You will typically drill one or two pockets per joint depending on the width of the piece:
- Narrow stock (under 3 inches wide): one pocket centered in the width
- Standard boards (3 to 6 inches wide): two pockets, spaced roughly 1 inch from each edge
- Wide pieces or sheet goods: three pockets spaced evenly across the width
Blow the chips out of the pocket before assembly. A chip at the bottom of the pocket can hold the joint open, which shows as a gap on the face side.
Clamping and Assembling the Joint
This step separates tight joints from gapped ones. As the screw drives home, it can push the mating piece forward or sideways if nothing is holding it. There are two ways to handle this.
Face clamp method: A face clamp (Kreg makes a dedicated one, but any clamp that reaches both pieces works) holds the faces flush before and while you drive the screw. This is the reliable method for furniture work where the face side needs to look clean.
Bench vise or fixture: For production work like building a run of cabinet face frames, clamping each joint individually is slow. Instead, clamp both pieces in a bench vise or use a right-angle corner clamp to hold them in position while you drive several screws in sequence.
Driving the screw itself is straightforward. Use a square-drive (Robertson) or Torx bit, not Phillips. Pocket hole screws are almost always square-drive, and the spec bit is usually included with the jig. Set your drill or driver to a torque setting rather than full power. When the head seats in the counterbore, the clutch should kick out. Over-driving strips the pocket and splits the thin wood above the hole.
Common Mistakes to Avoid
A few issues come up repeatedly with beginners:
- Mismatched settings. The collar and the guide block must both be set to the same thickness. Setting one and forgetting the other is the most common source of gaps.
- Wrong screw length. A screw that is too long will push through the mating piece. When in doubt, measure the combined thickness of both pieces and choose the screw length one size shorter.
- Skipping the clamp. No clamp, even on a small piece, usually means a shifted joint. Even holding the pieces together firmly by hand while driving is better than nothing, but a clamp is always more consistent.
- Driving too fast. High-speed driving on the final pass can strip the pocket. Slow down as the head approaches the counterbore.
For more on using other power tools in the shop, see our guide to circular saw basics for accurate cuts and how to use a router as a beginner. If you are finishing the surfaces before assembly, getting started with a random orbital sander covers what you need to know.
Frequently Asked Questions
Do I need to use glue with pocket hole joinery? Glue is optional but adds meaningful strength, especially on long-grain face joints. For most furniture carcasses and face frames, the screws alone hold fine under normal load. For joints that will see repeated stress or racking, adding a thin bead of wood glue to the mating faces before assembly is worth the extra step.
Can I use pocket holes in plywood? Yes. Plywood is one of the most common materials for pocket hole joinery in cabinet work. Use coarse-thread screws, and avoid drilling pocket holes closer than 1 inch to the edge of the panel to prevent the face veneer from splitting.
What if the joint has a gap after assembly? A small gap usually means the drill collar was set too deep, the screw was too short, or the joint shifted during driving. Disassemble, check your collar and jig settings against your actual material thickness, and reassemble with a clamp holding the pieces flush.
Do I need an expensive jig to get good results? No. Entry-level pocket hole jigs in the $30 to $50 range produce the same joint geometry as higher-end models. The main difference is build quality and whether the clamp is integrated. For occasional projects, an entry model is plenty. For regular cabinet work, a jig with a built-in clamp saves meaningful setup time.
How strong are pocket hole joints compared to mortise and tenon? Pocket hole joinery is faster and more accessible but is less strong than a well-fitted mortise and tenon, particularly in tension (pulling the pieces apart). For chairs, drawers, or anything that will see significant racking or pulling force, consider a stronger joint. For face frames, shelf units, and cabinet cases, pocket hole joints are a practical choice.