Joinery
How to Use Dowels for Clean, Hidden Joints
Learn how dowel joints work, what tools you need, and how to drill accurate holes for hidden wood joints that hold as well as they look.
Dowel joints let you connect two pieces of wood with no visible hardware and no exposed joinery faces. If you want a furniture piece that looks like it was born in one piece, this is one of the most practical methods available to a beginner.
What a Dowel Joint Actually Is
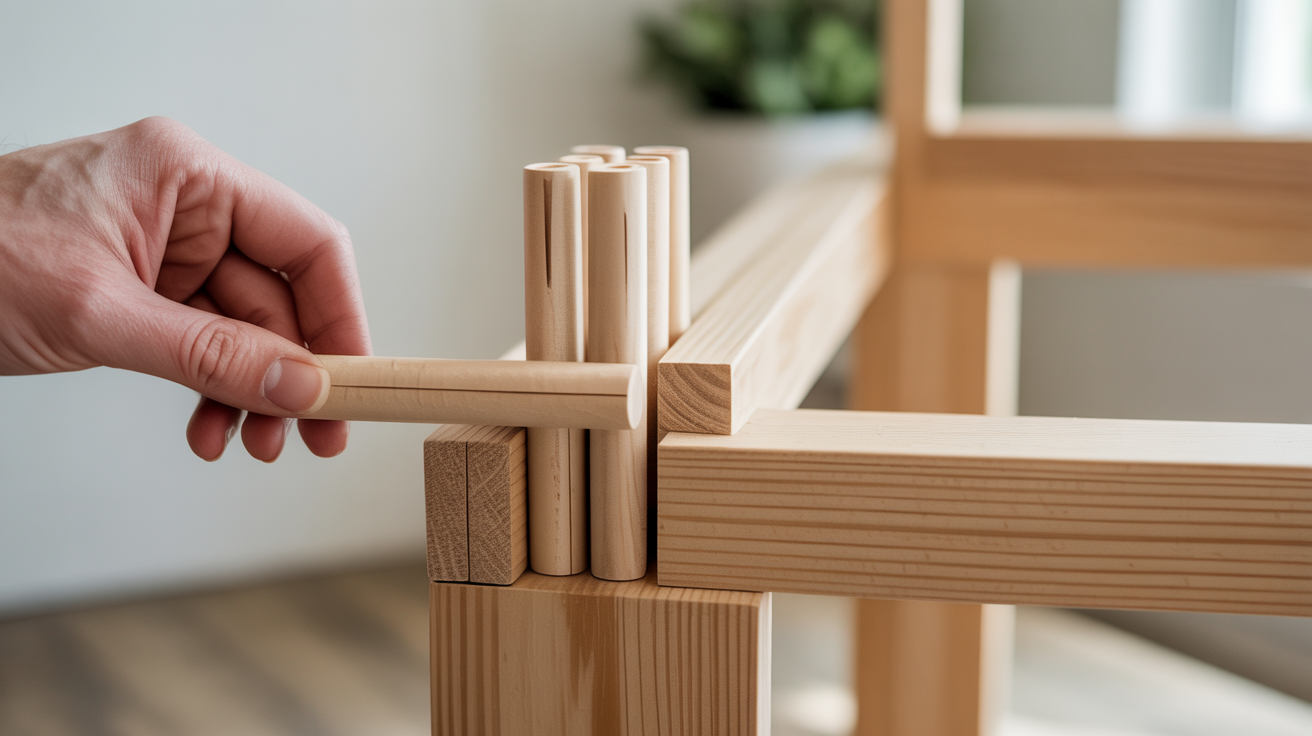
A dowel joint uses short cylindrical wooden pins seated in matching holes drilled into both mating pieces. When the holes line up perfectly, the dowels act as alignment guides and mechanical reinforcement. Glue applied to the holes and dowel surfaces bonds everything into a single rigid unit.
The appeal of hidden wood joints is mostly visual: no screws showing, no pocket holes on the underside, no visible biscuits. The joint is entirely internal. That matters on tabletops, cabinet face frames, chair legs, and any surface people see from multiple angles.
Compared to pocket-hole joinery, dowel joints take more setup time but leave a cleaner surface. Compared to a mortise and tenon, they require less material removal and no chiseling. For a beginner with a drill and a bit of patience, dowels are often the easiest path to a joint worth being proud of.
Tools and Materials You Need
Getting the tools right before you start saves a lot of frustration. The most important item on this list is the doweling jig.
Doweling jig: This tool clamps to your workpiece and guides the drill bit so every hole goes in straight and at the correct depth. Without one, it is nearly impossible to drill two holes in separate boards that line up accurately. There are two main types:
- Self-centering jigs automatically center on the edge or face of a board. Good for edge-to-edge joints and face frame connections.
- Fixed-guide jigs have bushings at set spacings. You position them manually using layout marks.
Either type works for most beginner projects. The self-centering style speeds things up once you get used to it.
Everything else you need:
| Item | Notes |
|---|---|
| Drill (corded or cordless) | Sharp battery charge matters more than corded vs. not |
| Brad-point drill bits | Cleaner hole edges than twist bits; match the dowel diameter |
| Dowel pins | Pre-grooved pins sold in 6mm, 8mm, and 10mm sizes; grooves let glue escape |
| Wood glue | Standard PVA works fine; you don't need anything exotic |
| Bar clamps or pipe clamps | At least two per joint; more is better |
| Marking tools | Pencil, combination square, marking gauge |
| Depth stop or tape flag | Wraps around your bit to mark drilling depth |
| Mallet | For tapping dowels home during assembly |
One small but useful addition: dowel centers. These are metal points that press into the drilled hole on one board, then transfer a center mark to the mating board when you press the pieces together. They are cheap and they eliminate a lot of measurement error.
How to Mark, Align, and Drill the Holes
Accuracy here determines whether the joint closes flush or gaps on one side.
Step 1: Mark the hole positions on the first board
Use a combination square and pencil to mark hole centers on the edge or face of your first piece. For most furniture applications, two or three dowels per joint is enough. Space them at least 25mm (about 1 inch) from each end of the board, and no closer than 25mm to each other.
Mark the exact center of the board thickness with a marking gauge so your holes go in straight across the joint face.
Step 2: Drill the first board
Attach your depth stop or wrap tape around the bit. Dowel holes should be drilled about 1.5 to 2mm deeper than half the dowel length. A 40mm dowel needs holes about 21 to 22mm deep in each board, not exactly 20mm. That small extra depth gives the glue somewhere to go when the dowel compresses it on the way in.
Clamp the doweling jig to the board, center it on your marks, and drill. Keep the drill perpendicular. Brad-point bits are forgiving here, but a crooked bit will telegraph into a misaligned joint.
Step 3: Transfer marks to the second board
This is the step most beginners rush and regret. There are two methods:
Dowel centers method: Insert dowel centers into the holes you just drilled. Hold the second board in its final mating position, then press the boards together firmly. The points leave small dents exactly where the holes should go on the second board. Drill those marks.
Direct measurement method: Measure from a common reference edge on both boards and mark matching positions. This works but introduces more room for small errors to stack up.
Step 4: Drill the second board
Same process as the first. Use the jig, check your depth, keep the drill straight. Before gluing anything, do a dry fit.
Dry-Fitting and the Glue-Up
A dry fit with all dowels seated tells you two things: whether the holes lined up and whether your clamps are long enough to close the joint. Do not skip this step.
Push the dowels into the first board by hand or with a light mallet tap. They should seat snugly but without needing force that makes you wonder if something is wrong. Then bring the second board up and seat it. If the joint closes with hand pressure and a mallet tap, you are ready to glue.
If the boards pull apart or won't seat, check which holes are off. Sometimes a hole is slightly shallow. Drill a millimeter deeper. If a hole is off-center, fill it with a toothpick and a drop of glue, let it cure, and redrill.
Applying the glue
Squeeze glue into each hole and use a small brush or a folded piece of scrap cardboard to coat the walls. Apply glue to the dowel surfaces as well, but not so much that the excess has nowhere to go. Excess glue inside a blind hole creates hydraulic pressure that can split a board when you drive the dowel home.
Drive the dowels into the first board, then apply glue to the mating holes and seat the second board. Close the joint with hand pressure before reaching for a clamp.
Clamping
Apply clamps perpendicular to the joint line so the clamping pressure closes the joint rather than shifting it sideways. Light to moderate pressure is enough. You want the glue line to be tight, not for the clamp to crush the wood. Glue that squeezes out from the joint face is a good sign the joint is fully seated.
Wipe squeeze-out with a damp cloth before it skins over. Let the assembly cure for the time listed on your glue bottle, usually at least an hour before handling and 24 hours before putting the joint under load.
What Goes Wrong and How to Fix It
Holes that don't line up: The joint will not seat, or it seats with a visible step where the board faces don't flush up. Cause is almost always the jig moving during drilling or a measurement error on the second board. Use dowel centers next time. To fix a bad hole, plug it with a snapped-off toothpick and glue, let it cure, and redrill.
Dowels that won't drive home: Hole is slightly too tight or too shallow. Check depth first. If depth is fine, a brad-point bit one size up (just a fraction larger) clears material from the walls and solves it.
Joint gaps after clamping: The dowel is holding the joint slightly open, either because a hole is too shallow or the dowel is a hair too long. Drill both holes 1mm deeper and retest.
Glue squeeze-out inside the joint: Grooved dowels are made for this reason. The grooves let displaced glue travel up and out as the dowel seats. Always use pre-grooved pins, not smooth wooden pegs.
If you enjoy the precision side of joinery, dowels are a good bridge toward more demanding work. Dovetail joints require a similar obsession with marking accuracy, just with a saw instead of a drill.
Frequently Asked Questions
How many dowels does a joint need? For most butt joints and edge-to-face connections in furniture, two to three dowels per joint is enough. Wider boards like tabletop panels get more, typically one every 150 to 200mm along the joint. More dowels add alignment security but do not dramatically increase glue strength since the glue does most of the holding.
What size dowels should I use? Match the dowel diameter to the thickness of the thinner board. A common rule is to use a dowel no wider than one-third to one-half the thickness of the workpiece. For 18mm (3/4-inch) stock, 8mm dowels are standard. For 25mm (1-inch) stock, 10mm dowels work well.
Do I need a doweling jig, or can I just measure carefully? You can try measuring carefully, but hand-drilling two separate boards so their holes line up is genuinely difficult. Even a 1-degree angle error at the drill compounds into a visible offset at the joint. A doweling jig is one of the better small investments for this kind of work.
Can dowel joints handle stress and movement? Yes, with limits. Dowel joints handle shear forces well, which is the lateral load most furniture joints face. They are weaker in tension (pulling the joint apart end-on) than a mortise and tenon, so they are not ideal for chair rungs or anywhere a joint faces repeated racking loads. For shelves, face frames, tabletops, and case goods, they are more than adequate.
What wood should I use for the dowels themselves? Birch is the standard material for commercial dowel pins. It is dense, consistent, and drills cleanly. Avoid softwood dowels in hardwood joinery because the softwood compresses rather than gripping. Buy pre-made fluted birch pins rather than cutting your own from dowel rod.